Lead Data Validation Rules
Pankaj Kumar
In any CRM, the quality of data has a direct impact on sales efficiency, reporting accuracy, and informed decision-making. Lead Data Validation Rule ensures that agents enter only clean, consistent, and valid data by applying logical conditions to lead fields.
When a rule is violated, the system:
- Blocks the update
- Displays a clear error message
- Guides the agent to correct the mistake before proceeding
This prevents bad data from entering the system, keeping your CRM reliable.
What Are Lead Data Validation Rules?
Validation Rules are customizable conditions that determine what type of data can or cannot be entered in CRM lead fields.
Think of them as safeguards.
- They prevent mistakes before they happen
- They guide agents with error messages so they know how to fix issues
- They save hours of cleanup later
Here are some example scenarios.
- Discount Restrictions:
- For Facebook/Google Ads leads → Discount cannot exceed 20%
- For Other leads → Discount cannot exceed 25%
- Date Validation: End Date must always be greater than Start Date
- Relational Field Check: Field A must be greater than Field B
- Conditional Mandatory Field Check: If Lead Stage = Opportunity, then the Revenue field must not be empty
- Format Validation: Aadhaar Number must contain exactly 12 digits
If an invalid value is entered, the CRM blocks the update and shows an error message explaining what went wrong.
Why Are Lead Data Validation Rules Important?
Validation rules bring measurable advantages to your CRM operations:
- Data Accuracy and Consistency: It eliminates incomplete or invalid entries, maintaining clean and reliable records
- Time Efficiency: Automated checks reduce manual reviews and save hours for admins and sales teams.
- Real-Time Guidance: Contextual error messages, e.g., “For Facebook leads, discount cannot be greater than 10% help agents correct mistakes instantly.
- No-Code Simplicity: Business users can set up rules without coding, formulas, or RegExr.
Preparation Before You Begin
Before configuring your first rule, consider these points:
- Identify Common Errors: Review data entry mistakes made by agents. Example: missing mandatory fields, incorrect discounts, and invalid dates.
- Define Conditions: Decide what checks are required for your sales processes. Example: “If Stage = Opportunity, Revenue is mandatory”
- Assign Ownership: Decide who in your team, Admin/Manager, will manage these rules and configure them.
Creating a Lead Data Validation Rule Step-by-Step Guide
Follow the steps below to configure your first validation rule.
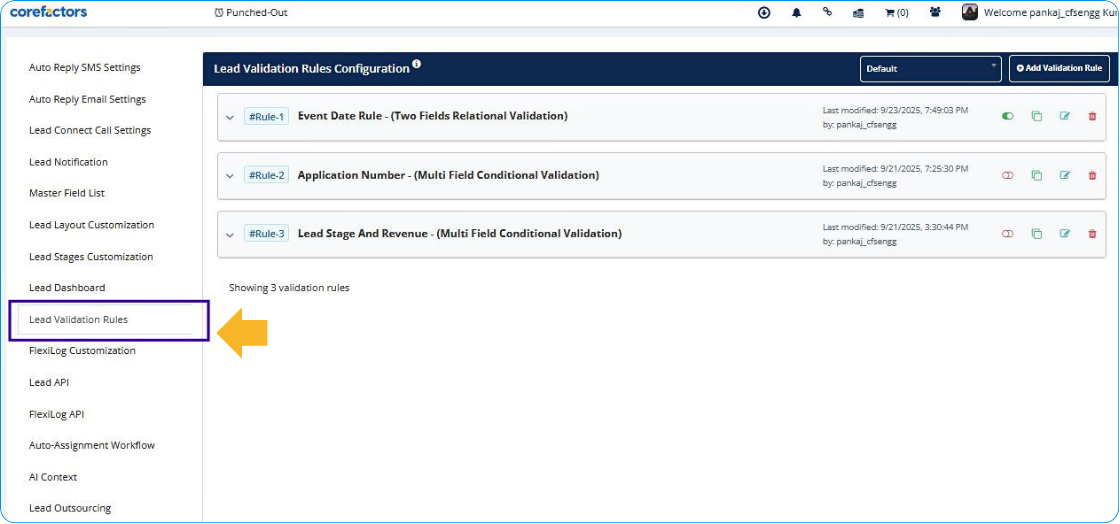
Step 1: Navigate to Validation Rule Setup on your Corefactors account from the LeadBox
- Go to Lead Box > Lead Box Configuration > Lead Validation Rules
- Click Add Validation Rule
Step 2: Enter Basic Rule Details
- Rule Name: Give a descriptive name (e.g., Discount Restriction – Facebook Leads)
- Rule Description: Document the purpose of the rule for reference
Step 3: Select Validation Type
You can choose between two types:
- Multi-Field Conditional Validation: Validates data across multiple fields of different data types. For example, if Lead Source = Facebook AND Discount > 20%, restrict update
- Two-Field Relational Validation: Checks logical relationships between two fields of the same data type. It is valid for only Number, Currency, Date picker, and Date-time picker data types. For example, End Date must be greater than Start Date
Step 4: Select Applicable Layout
- Choose the Lead Layout where the rule should apply
- Note: Layouts allow different teams to use customized lead forms, fields, and stages
Step 5: Define Conditions
- Select fields involved in the rule
- Apply logical conditions/operators (e.g., >, <, =, Empty, Is Empty, Contains, Exactly x chars, within next x days etc. based on selected field data type)
Step 6: Configure Error Message
- Enter a clear message that guides the agent
- Example: “Revenue field is required when Lead Stage is Opportunity”
Step 7: Save and Apply Rule
- Click Save Rule
- The rule is now active on the chosen layout
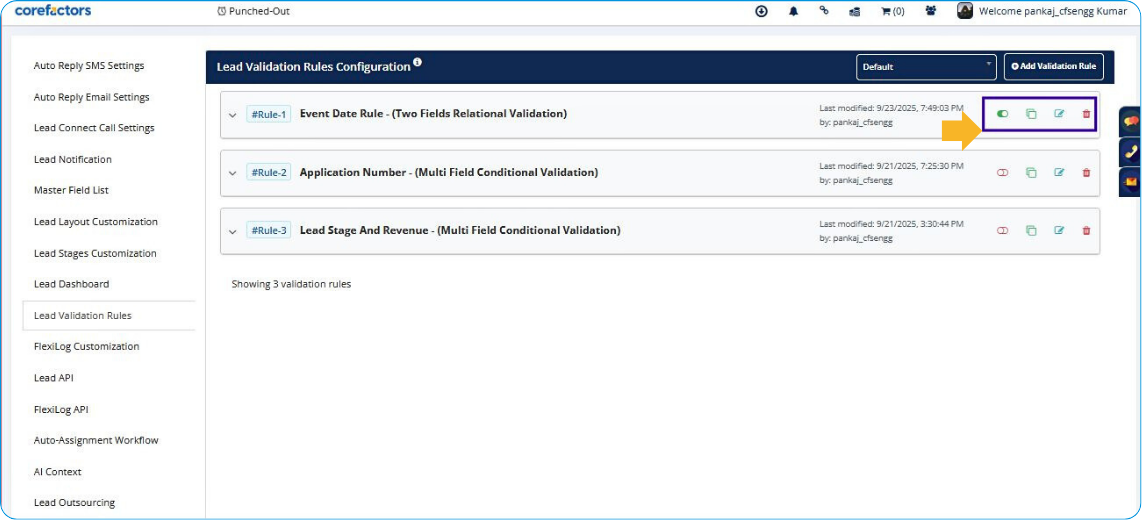
Managing Lead Data Validation Rules
Once created, you can:
- Edit Rules: Modify conditions or error messages
- Clone Rules: Reuse existing rules across different layouts
- Activate or Deactivate: Toggle rules on or off without deleting them
- Delete Rules: Remove rules no longer needed
Examples
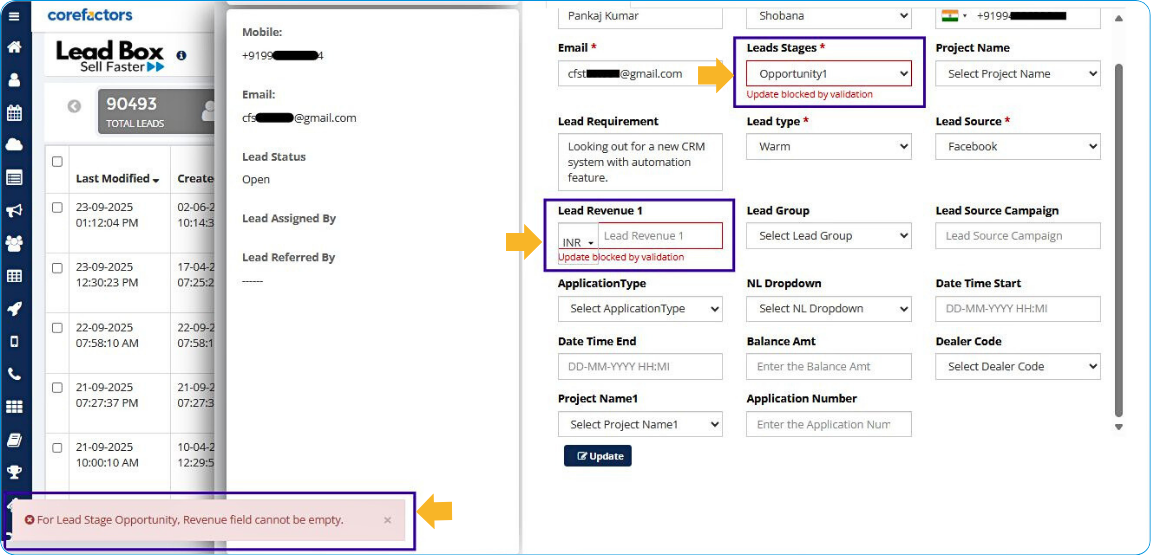
Example 1: Multi-Field Conditional Validation
- Rule: If Lead Stage = Opportunity1 AND Lead Revenue1 = Empty
- System Action: Block update and show error “For Lead Stage Opportunity, Revenue field cannot be empty”
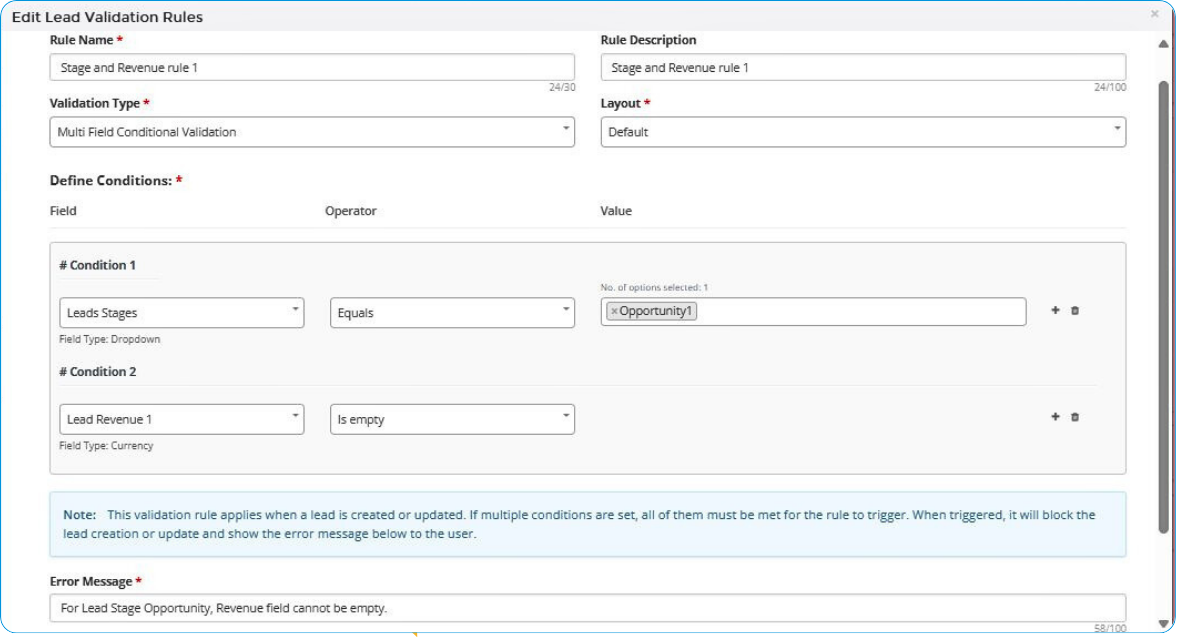
This is how it would restrict Lead Update if wrong or invalid entries are filled.
Example 2: Two-Field Relational Validation
- Rule: Event Start Date Time <Greater than or equal> Event End Date Time
- System Action: Block update and show error “Event start-datetime cannot be greater than Event end-datetime. Kindly enter the correct values”
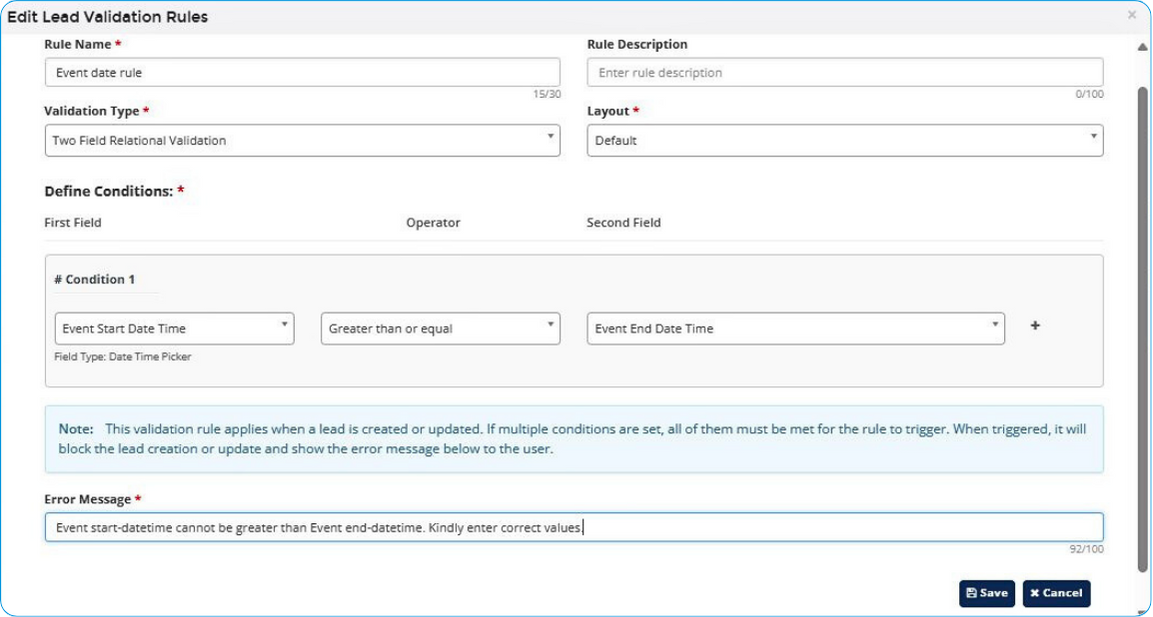
This is how it would restrict Lead Update if wrong entries are filled.

Key Limitations
- Maximum Rules per Account: 7 rules
- Maximum Conditions per Rule: 5 conditions
Best Practices
- Keep rules simple and descriptive for easy maintenance
- Use clear error messages that guide agents to correct the mistake
- Regularly review and refine rules based on new sales processes
- Avoid over-restricting, as too many rules may frustrate users
For assistance or troubleshooting, please reach out to the Corefactors Support Team at helpdesk@corefactor.in


.png)